1. Open VCenter and select Convert Mechine

- VCenter
2. Specify Source: On the new screen you we will need to select source which will be the system you want to virtulize.
• From the dropdown select Power-on machine. • Make sure you select this local machine.
- Specify Source
3. Specify Destination: On this screen you will need to specify the destination and destination type i.e. if you want the virtual machine to be a workstation or a vmware Infrastructure guest machine.
• Select the destination type as Vmware Workstation or Other VMware or virtual machine • Select a VMware product VMware Worksation 6.5.x • On the virtual machine details section You will need to give the name of the system (what ever you want it to be known as) • Specify the destination to store the vm ( you will find the .vmdx file eg. TechnoMechine.vmdx)
- Specify Destination

- View and Edit VMware

6.Networks: this section is to choose how you want the vm to connect to the network.
We have 3 options:
•Bridge that allows you to connect directly to the physical network.
•NAT (Network Address Translation) Used to share the host IP address. (recommended)
•Host-only that setup a private network share with the host machine. 
7.Services: always make sure you disable all the services which are specific to the hardware as you will not need them once the system is virtualized. an example is Apple Mobile device for iPhone.

8. Ready to Complete: Summery of all the selections you have made just go through it to be sure that you have selection is correct. If you wish to change something you can still hit on the back button and get it changed.
Once you confident that you have everything correct on this page click Finish and sit back and relax. Once you confident that you have everything correct on this page click Finish.

- Physical to Virtual Conversion by VmWare Vcenter
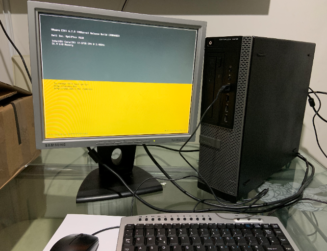
After the P2V is completed, I used the VM ware Player to open the .vmdk file this understands that it’s a virtual machine and starts the system. Just by chose the option that says open an existing VM machine. And browse to the .vmdx file, you should be ready to play the vm.
 We can also Save/Restore the VM to save time which is similar to hibernation
 After opening XP vm I am connecting to the VPN to make sure the RSA still work after vitalizing.
 If anyone wants to do this and need any help just let me know I will update this post with step by step instructions for doing the P2V conversion.
Advantages of virtualization:
• Save hardware replacement cost on event of hardware failure. best for old servers that are running crappy hardware and keeps braking every other week.
• Save maintenance cost.
• Save energy as your not powering it on its running on another Server
• You will eventually save money on cooling too.
• Most importantly if you think that the Virtual machine needs more memory all you would need to do is shut down and increase memory.
• The same applies to disk space all you will need to do is add a new Virtual disk image and map it to the VM it will start looking at the new data store in My Computer.
If anyone has any questions please feel free to comment .]]>
If anyone wants to do this and need any help just let me know I will update this post with step by step instructions for doing the P2V conversion.
Advantages of virtualization:
• Save hardware replacement cost on event of hardware failure. best for old servers that are running crappy hardware and keeps braking every other week.
• Save maintenance cost.
• Save energy as your not powering it on its running on another Server
• You will eventually save money on cooling too.
• Most importantly if you think that the Virtual machine needs more memory all you would need to do is shut down and increase memory.
• The same applies to disk space all you will need to do is add a new Virtual disk image and map it to the VM it will start looking at the new data store in My Computer.
If anyone has any questions please feel free to comment .]]> Hi Ibrahim,
I am satiated with your explanations and one more thing made me proud of you, you have completely explained it in pictorial which is very easy for readers to follow. Having said, lucid explanation.
For sure I’ll re-share it on Digg, reddit, and Facebook. Thanks much, Ibrahim; for providing this informative post. (Subscribed)
Hi Michael,
I am happy to know that you like the post. Thanks for sharing it.
If you have any questions regarding VMware /Windows please feel free to contat me.
Beset Regards,
Ibrahim.
Thank you for the post, it is a complete guide that I am about to follow.
The only question I have is: what about windows guest license? Did you have to reactivate it? In that case, the old w’xp license is lost?
Thanks in advance
Hi Juan,
I am happy to be helpfull, and glad that you like my post.
If the Windows XP Operating System is activated then it will be the exact copy of your physical mechine and will hold the same key of the physical mechine.
Hi Ibrahim,
I have an application installed in my laptop in my home . and i want to use that application from my office thru another personal laptop while im in office and also i want my lap in my home to be free to be used by anyone at home without interfering with my activities .could you please guide me
thanks
Shanu
thanks 4 this
What’sup, I want to subscribe for thi web site to get hottest
updates, thus whrre can i do it please hlp out.
Hello would you mind letting me know which hosting company you’re using? I’ve loaded your blog in 3 completely different internet browsers and I must say this blog loads a lot faster then most. Can you suggest a good web hosting provider at a reasonable price? Thanks, I appreciate it!
I have my blog managed by https://plugmatter.com
I constantly emailed this blog post page to all my friends, because if like to read it next my friends will too.|
[…] 0 Last Friday I have virtualized my Windows XP Laptop, before I start telling you guys, how its done I think its worth mentioning why I need to do it? We normal virtualize the physical server that are very old and start getting faulty very offten or they are too big for us to keep in our data centers. I have dual booted my laptop with Windows 7 '64 bit' edition. which works brilliant. However as this is 64 bit version of windows I had to … Read More […]